

Good garage workbench lighting does more than make the space look cleaner. It lets you see layout marks, fasteners, blade edges, wiring colors, and the small mistakes that turn into bigger ones once the tool is running. The goal is not simply to blast the bench with more light. It is to put usable light where your hands and tools are working without creating glare that feels like staring into a headlight.
This guide shows you how to assess the shadows around your workbench, improve general garage lighting, and add adjustable task lighting where it matters most. Most placement and plug-in lighting improvements are beginner-friendly. Hardwired fixtures, new circuits, and added receptacles are a different animal and are best handled by a qualified electrician.
Quick Overview
You’ll learn how to build a layered garage workbench lighting setup: broad ambient light for the room, plus local task lighting that reaches the bench from a useful angle.
This approach works for nearly any bench task, from bike repairs and woodworking to electronics, paint touch-ups, and engine work. It is especially helpful if your body blocks the overhead fixture every time you lean over the workpiece. More lumens won’t fix a shadow cast by your own skull. Placement will.
This guide is best suited for homeowners improving an existing workbench. Start by assessing the current lighting and experimenting with fixture placement. Mounting plug-in task lights may take additional time depending on the bench and wall material. Installing permanent wiring, ceiling fixtures, or new outlets requires more planning and may require an electrician and compliance with local electrical requirements.
What You’ll Need
- Existing garage and workbench lighting turned on for evaluation
- A task light, under-cabinet-style work light, or adjustable-arm bench lamp suitable for the location
- Mounting hardware recommended by the light manufacturer
- Screwdriver, drill, and appropriate bits if mounting a fixture
- Stud finder or another suitable method for locating solid mounting points, when needed
- Tape measure and pencil for fixture placement
- Step stool or ladder suitable for ceiling-level work
- Safety glasses for drilling or overhead work
- Manufacturer instructions for every fixture you install
- Access to a properly installed receptacle for plug-in lighting
If the garage is periodically humid or develops condensation, choose fixtures marked for damp locations. If water may drip, splash, or flow onto the fixture, use equipment marked for wet locations instead. Those ratings are not decorative fine print; they indicate where a luminaire is intended to be used. UL’s guidance on luminaire location ratings is a useful reference if your garage conditions are questionable.
Before You Begin
Start with the bench as you actually use it, not as it looks when it has been clean for five minutes. Put a typical workpiece in the vise, lay out the tools you commonly use, and stand in your normal working position. Turn on the existing lights and look for three problems:
- Your head, shoulders, hands, or tools casting shadows across the work
- Bright reflections on metal, glossy finishes, screens, or safety glasses
- Dark zones near the back, front, or ends of the bench
Evaluate the lighting from your normal working position, because that is where shadows and glare become real problems. The Canadian Centre for Occupational Health and Safety recommends checking work areas for shadows, glare, and uneven illumination rather than judging the room as a whole.
Shut off power at the breaker before working on any hardwired fixture. Do not treat a wall switch as proof that wires are dead. If you are only mounting a plug-in light, keep cords away from hot tools, moving equipment, sharp edges, walkways, and places where drawers or doors can pinch them.
Avoid building a permanent lighting arrangement around extension cords. The Consumer Product Safety Commission advises that extension cords are for temporary use. If your bench needs permanent power where none exists, have a qualified electrician install an outlet or circuit that suits the space.
Step-by-Step Instructions
Step 1: Map the shadows at your workbench
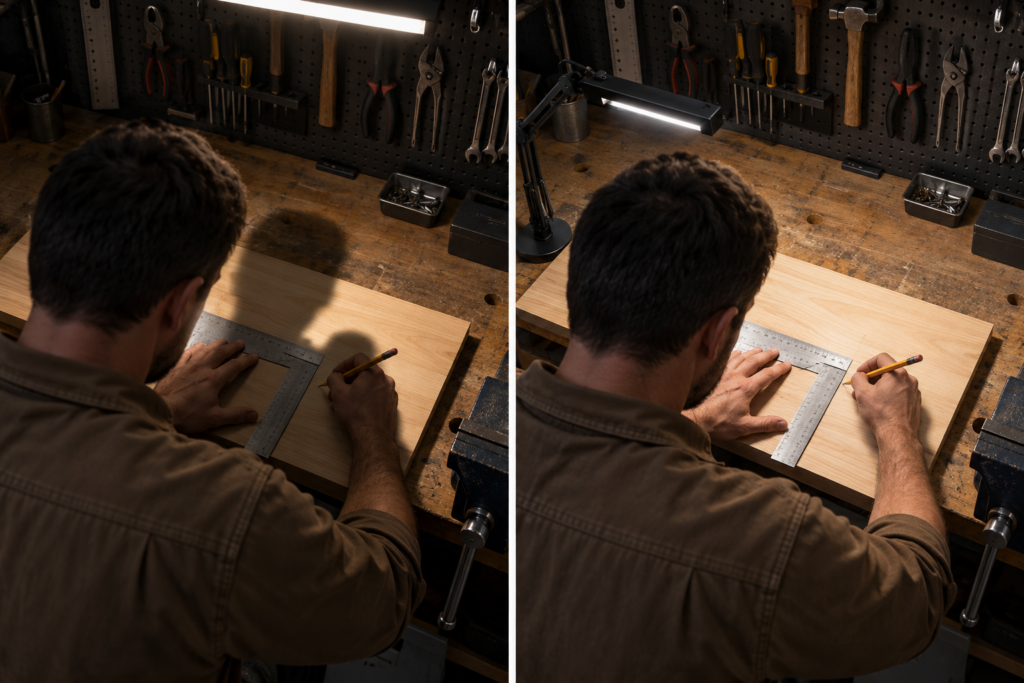
Use the bench for a few minutes under the current lighting. Hold a small part, make pencil marks on scrap wood, open a tool drawer, and lean over the vise. This gives you a better picture than standing back and declaring the garage “pretty bright.”
Notice where each shadow lands while you work. If the ceiling fixture is behind you, your upper body may block it. If it is directly above and slightly rearward, your hands can still shade the work surface. Also check whether an upper shelf, pegboard, cabinet, or open garage door prevents light from reaching part of the bench.
Mark the areas where you need the clearest view. For most benches, that includes the primary work zone, the vise area, and any spot used for close-up jobs such as wiring, sanding, measuring, or sharpening.
Step 2: Improve the room’s general lighting first
General lighting provides the baseline visibility that keeps the garage from feeling like a cave with one suspiciously bright corner. It should light the overall room and prevent the workbench from being illuminated only from behind you.
If you are adding or repositioning ceiling fixtures, think about where you stand at the bench. An arrangement that places all the light behind you will produce shadows no matter how bright the fixtures are. Better distribution across the garage ceiling helps reduce those blocked-light zones.
Do not expect ambient lighting alone to solve detail work. Lumens describe how much light a fixture produces, but they do not tell us how much useful light actually reaches the work surface. Distance, angle, diffusion, fixture placement, and anything blocking the beam all affect what we can see at the bench. Broad ceiling lighting is the foundation, but the bench usually needs its own local source. That is the difference between seeing the whole garage and seeing the tiny retaining clip that just bounced into a dark crack in the universe.
Step 3: Choose task lighting that can be aimed and controlled
An adjustable task light is often the simplest answer to garage workbench shadows. Look for a fixture that can be directed at the active work area and has a diffuser, shield, or other feature that keeps the bare light source out of your normal line of sight.
A clamp-on or articulated-arm lamp can work well when the bench layout changes often. A mounted task light may be a better choice when you have a dedicated work surface and want the lighting to stay put. Under-shelf or under-cabinet lighting can also be useful if there is a shelf above the bench, provided it does not create harsh reflections or interfere with headroom.
For ordinary garage work, choose lighting with a color rendering index, or CRI, of at least 80. CRI describes how faithfully a light source renders color; it is not a brightness rating. For color-sensitive tasks such as paint matching, finish work, or distinguishing wiring colors, consider 90+ CRI. The Department of Energy’s LED basics guide explains the distinction.
Step 4: Mount the task light to create a second angle
Place task lighting so it reaches the bench from the front or side rather than duplicating the direction of the overhead fixture. The aim is to create two useful lighting angles: general light from above and local light that fills the shadows created by your body, hands, or tools.
For a right-handed person, placing the task light toward the left-front side of the bench may reduce shadows from the working hand. Left-handed users may prefer the opposite side. This is not a law carved into a granite shop wall. Test the position while doing actual work and move the light if your hand still blocks the view.
Mount the fixture securely according to its instructions. Do not fasten a heavy light to thin pegboard, loose shelving, or a cabinet panel that cannot support it. If mounting to a wall, use appropriate anchors or fasten the fixture into solid framing where required by the manufacturer.
Step 5: Aim the light at the work, not at your eyes
Turn on the task light and adjust it while standing at the bench. The light should reach the active work area without shining directly into your eyes or bouncing harshly off shiny metal. A bright reflection can hide details just as effectively as a shadow.
If glare appears on a polished tool, bare metal workpiece, phone screen, or glossy instruction sheet, shift the light’s angle rather than assuming the fixture is wrong. Small changes in height, side-to-side position, and tilt can make a big difference.
Diffusers, shielding, and matte surrounding surfaces can help reduce glare and harsh contrast. OSHA recommends positioning task lighting to avoid reflected glare and using diffusers or shielding when overhead fixtures create harsh light. See its guidance on workstation lighting conditions.

Step 6: Test the setup with real bench tasks
Do not call the job finished until you test the lighting with the work you actually do. Make a pilot mark in scrap lumber, read a small socket marking, inspect a fastener, or lay out a cut line. Move around the bench and open drawers or cabinets that may block the light in certain positions.
Pay attention to whether the light reaches the front and back edges of the bench. A fixture can make the center look excellent while leaving the area near the wall in a gloomy little cave.
If a shadow appears, identify what is blocking the light. Then change the task light’s angle, add a second adjustable source, or reconsider the ambient fixture layout. The solution is usually directional, not simply “buy a brighter bulb.”
Step 7: Set light color and finish the surrounding area
Color temperature, expressed in Kelvin, describes whether the light appears warmer or cooler. It does not tell you how bright the light is or guarantee better visibility. Choose an appearance that feels comfortable for the work you do and fits reasonably well with the rest of the garage lighting.
Also look at the surfaces around the bench. Very dark walls, shelves, and worktops absorb more light, while lighter matte finishes can help soften contrast and reflect light more evenly. Avoid highly glossy surfaces near the work area if they create distracting reflections.
Helpful Tips
- Keep one movable task light available even if you install fixed bench lighting. It is handy for working inside cabinets, behind equipment, or on bulky parts.
- Recheck the lighting whenever you add an upper cabinet, deep shelf, pegboard panel, or large tool chest. Storage can quietly block light paths.
- Clean diffuser covers and fixture lenses occasionally. Dust and garage grime can reduce useful light.
- Use separate switches when possible. You may want broad garage lighting for cleanup and only bench lighting for a close-up repair.
- Place cords where you can see and inspect them. A cord hidden behind a crowded bench is usually discovered only after it has been scraped, pinched, or chewed by something with questionable judgment.
- Keep task lights away from flammable vapors, finishing products, and heat-producing equipment. Follow the fixture manufacturer’s placement instructions.
Common Mistakes to Avoid
- Adding one brighter overhead fixture and expecting shadows to disappear. Brightness helps only when the light reaches the work from a useful direction.
- Putting all bench lighting behind the worker. Your body will become the world’s least helpful lampshade.
- Using an exposed, intense lamp at eye level. Direct glare causes discomfort and can obscure details on the workpiece.
- Ignoring reflections from shiny surfaces. Reposition or diffuse the light when metal, screens, or glossy finishes throw bright hotspots back at you.
- Using CRI as a substitute for adequate lighting placement. Higher CRI improves color fidelity; it does not eliminate shadows or automatically increase brightness.
- Leaving extension cords in place as permanent wiring. Use properly installed permanent outlets when the bench needs ongoing power.
- Installing fixtures without checking the garage environment. Damp or wet conditions call for fixtures rated for those locations.
- Mounting a heavy light to weak material. Use suitable fasteners and a solid mounting surface.
Final Thoughts
The best garage workbench lighting setup is rarely one giant fixture. It is a layered arrangement that provides broad visibility, then fills shadows at the exact spot where your hands are working.
Start by changing placement before chasing more brightness. Once light reaches the bench from more than one useful direction—and glare is under control—the work area becomes safer, more comfortable, and far less likely to hide the part you need.
Frequently Asked Questions
How do I stop my body from casting a shadow on the workbench?
Add adjustable task lighting from the front or side of the bench so it fills the shadow created by overhead lighting. Test the placement while standing and working in your normal position.
Is overhead lighting enough for a garage workbench?
Usually not for detailed work. Overhead lighting is important for general visibility, but a bench-mounted or adjustable task light provides better illumination where you are measuring, cutting, repairing, or assembling.
What CRI should I use for garage workbench lights?
A CRI of 80 or higher is a reasonable baseline for ordinary interior garage work. Consider 90+ CRI when accurate color identification matters, such as during wiring, paint, or finishing tasks.
Can I use an extension cord for a permanent workbench light?
No. Extension cords are intended for temporary use. If you need permanent lighting or power at the bench, have a qualified electrician install appropriate permanent wiring or outlets.