

A garage workbench upgrade is less about making the space look like a showroom and more about making it work when you need it. Reliable power, useful lighting, organized storage, and basic safety measures turn a frustrating bench into a place where repairs, maintenance, and weekend builds can move forward.
This checklist helps you evaluate and improve an existing garage work area without pretending every garage has the same wiring, walls, tools, or budget. Most organizing and plug-in lighting changes are beginner-friendly. Electrical work, panel issues, and permanent wiring upgrades are a different animal and may require a qualified electrician and local permits.
Quick Overview
Use this garage workbench upgrade checklist to spot what needs attention:
- Power: Sound cords and outlets, working GFCI protection, and convenient receptacles without cords crossing walkways.
- Lighting: Overhead light for the garage plus task lighting that keeps your hands and shoulders from shadowing the work.
- Storage: Frequently used tools within reach, heavy tools stored low, and shelving mounted within its rated capacity.
- Charging: A stable, ventilated charging area separated from flammable supplies and sparks.
- Safety: Working tool guards, clear exits and panel access, and accessible emergency supplies.
Start with damaged equipment and other hazards. Next, fix lighting and the storage problems that interrupt everyday work. Add convenience upgrades after those basics are handled.
Planning, cleanup, and storage changes can take a weekend or several shorter sessions. New circuits, fixed outlets, and hardwired lighting belong with a qualified electrician.
What You’ll Need
- Notebook, phone notes app, or simple sketch of the garage wall and workbench
- Tape measure
- Painter’s tape or a marker for laying out outlet, lighting, and storage locations
- Flashlight
- Cleaning supplies, shop vacuum, and trash or recycling bins
- Existing tool manuals and storage-product installation instructions
- LED overhead fixtures and/or task lights suitable for the garage, if upgrading lighting
- Storage suited to your tools, such as cabinets, shelving, drawer units, wall-mounted systems, bins, or a tool cart
- Manufacturer-specified mounting hardware for any wall-mounted or anchored storage
- Cord organizers or cord covers rated for the intended use
- Safety glasses, hearing protection, and dust protection appropriate for the tools and work you do
- A fire extinguisher selected for the hazards in your garage, if you do not already have one
For electrical changes beyond plugging in approved equipment, add a qualified electrician to the list. New circuits, fixed receptacles, hardwired lighting, panel work, overheating outlets, and recurring breaker trips are not casual add-ons.
Before You Begin
Start by clearing the bench and the floor around it. This is not busywork. You cannot plan a useful work zone while standing in a pile of mystery hardware, dead batteries, and a box labeled “cords?” from 2014.
Take stock of how you actually use the bench. Do you repair bikes, work on small engines, build wood projects, sharpen tools, solder electronics, or simply need a reliable place to fix household stuff? The answer determines where power, light, and storage should go. A bench used for delicate wiring needs a different setup than one used for grinding metal.
Next, inspect the existing electrical setup without taking anything apart. Check cords, plugs, power strips, outlets, and tool housings for cracks, loose parts, scorch marks, damaged insulation, or signs of heat. Remove damaged cords and tools from service rather than wrapping them in tape and hoping for the best. OSHA identifies damaged extension cords as shock hazards, and cords crossing walkways also create trip hazards.
Garages are among the locations where GFCI protection is generally required under the National Electrical Code, according to the Electrical Safety Foundation International. GFCI protection may be provided by a receptacle or circuit breaker. Use the built-in TEST and RESET controls as directed, and call an electrician if a device will not test or reset properly. Local code adoption, the age of the installation, and circuit details matter, so avoid guessing about compliance.
Finally, locate the electrical panel and make sure access to it stays clear. Plan your bench, storage, and rolling equipment so nothing blocks the panel or turns emergency access into a furniture-moving event.
Step-by-Step Instructions
Step 1: Define the workbench zone and the jobs it must handle
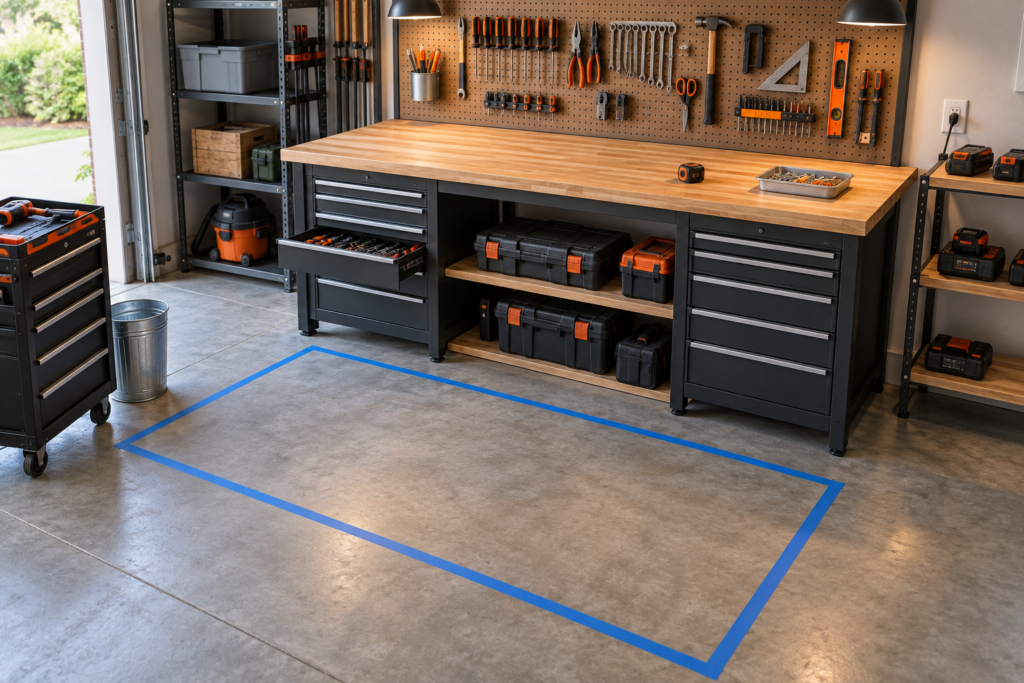
Measure the bench, nearby walls, overhead clearance, and the floor area in front of the bench. Mark the work zone with painter’s tape if that helps you visualize it. Include room for opening drawers, pulling out a tool cart, standing comfortably, and handling the longest material you commonly use.
Separate the area into simple zones: active work surface, frequently used hand tools, power-tool storage, supplies, charging area, and waste collection. Not every garage needs all of these, but the exercise reveals conflicts early. For example, a battery-charging station should not compete with the space where you routinely use solvents or pile oily rags.
Keep the primary bench surface as open as practical. A workbench covered edge to edge with permanent residents—bench grinder, charger, mystery cans, three projects—does not have much room left for actual work.
Step 2: Plan power around the bench, not around extension cords
Identify where you currently plug in tools, chargers, vacuums, and task lights. If cords routinely stretch across the floor, run behind your feet, or drape over the work surface, the work area needs a better power plan.
Fixed receptacles near the bench are safer and more convenient than using extension cords as permanent wiring. Keep extension cords for temporary use, choose cords appropriate for the environment and electrical load, and inspect them before each use. Do not run them under rugs, pinch them in doors, or route them where vehicles and foot traffic can damage them.
Test existing GFCI-protected receptacles or breakers using their TEST and RESET controls according to the device instructions. If GFCI protection is absent where it should be, a device will not reset, or an outlet is loose, warm, discolored, or intermittently powered, stop there and contact a qualified electrician.
If the layout needs additional fixed power, mark the locations where you use tools and discuss those needs with your electrician before buying equipment.
Step 3: Add layered lighting for the way you work
Good garage workbench lighting usually has two layers: broad overhead light for the room and dedicated task lighting aimed at the bench. Overhead fixtures help you move safely and find dropped hardware. Task lights help you see layout lines, fasteners, wiring colors, blade marks, and the tiny part that chose freedom at the worst possible moment.
LED fixtures are available for both garage and task-lighting applications, and ENERGY STAR notes that LEDs can use less energy and last longer than traditional lighting options. Fixture output alone does not solve everything, though. Placement matters.
Stand at the bench and notice where your body blocks the light. Add task lighting so it shines across the work rather than directly into your eyes. Position movable lights where they will not interfere with clamps, tool travel, cabinet doors, or long stock. Follow the fixture manufacturer’s mounting and electrical instructions. Hardwired lighting belongs in the electrician column unless you are qualified and local rules allow the work.
Step 4: Build storage around frequency, weight, and safe access
Put daily-use tools within easy reach of the bench: measuring tools, drivers, pliers, bits, blades, marking tools, and the fasteners you use often. Less-used tools can live farther away. The goal is to reduce clutter on the benchtop without making every small task require a scavenger hunt.
Store heavy tools, fluids, and dense boxes low. Place lighter, less frequently used items higher. Do not overload shelving, drawers, pegboard, wall systems, or cabinets. Follow the exact product’s stated load rating and mounting instructions, and use the specified hardware. Capacity depends on the product, fasteners, wall construction, mounting location, and how the load is distributed.
Anchor tall or top-heavy freestanding cabinets when the manufacturer calls for it, especially where children may enter the garage. The Consumer Product Safety Commission recommends securing top-heavy furniture to a wall and keeping climbable or tempting objects off the top.
Label bins and drawers clearly. A label such as “Electrical,” “Fasteners,” or “Bike Parts” beats dumping every odd item into a bin called “Garage.” Future you will appreciate the rare act of cooperation.
Step 5: Set up a safer charging and consumables area
Give battery chargers their own dedicated area, separate from adhesives, lubricants, solvents, and other consumables. Keep chargers on a stable surface with ventilation around them and follow the battery and charger manufacturers’ instructions. Plug chargers directly into suitable wall outlets rather than extension cords.
Separate flammable and combustible materials from heat-producing equipment, electrical tools, and ignition sources. The U.S. Fire Administration identifies gasoline, paints, propane, oil, varnishes, electrical tools, and stored combustibles as garage-fire concerns. Follow product labels and local requirements for storage and disposal. Store fuel and similar materials in an appropriate location away from the home when possible.
Keep oily rags in airtight containers away from heat, and follow the finish or solvent manufacturer’s disposal instructions. Never leave used rags piled on the bench or tossed into a cardboard box.
Step 6: Check tool setup, guards, and emergency access
Return tools to the bench only after inspecting them. Confirm guards are installed and working, blades and accessories are appropriate for the tool, and cords and switches are in sound condition. Do not remove guards because they are inconvenient. OSHA advises using working, appropriate guards and following the tool manufacturer’s rated capacity and operating instructions.
Keep a clear path to the garage exit and electrical panel. Maintain a visible, accessible first-aid kit and a fire extinguisher appropriate to the risks in your workspace. The U.S. Fire Administration explains that Class B-rated agents address flammable liquids, while multipurpose ABC extinguishers are intended for many common home-fire scenarios. Read the extinguisher instructions before there is an emergency, not while smoke is testing your reading speed.
Helpful Tips
- Mount or place task lighting so your hands and shoulders do not cast the main shadow across the work.
- Use a rolling cart for tools that serve several areas of the garage rather than crowding the bench permanently.
- Keep one small tray or magnetic dish for active fasteners and parts during a repair.
- Assign a home to every frequently used tool before buying more storage. Organization starts with decisions, not containers.
- Keep a clear strip of benchtop available for assembly and measurement.
- Recheck your layout after a few work sessions. The best plan on paper may need minor changes once real work starts.
Common Mistakes to Avoid
- Treating extension cords as permanent wiring. Add properly installed fixed power where tools are regularly used instead.
- Adding brighter overhead lights but no task lighting. General light helps, but close work needs light directed at the bench.
- Mounting storage before checking wall construction. Follow the product instructions and use hardware suited to the wall and load.
- Storing heavy tools overhead. Keep dense, awkward items low to reduce lifting strain and falling hazards.
- Blocking the electrical panel with cabinets or stacked bins. Keep access clear at all times.
- Ignoring damaged cords, loose outlets, or recurring trips. Stop using the affected equipment and call a qualified electrician.
- Removing guards from saws, grinders, or other tools. Convenience is not worth the risk.
- Storing oily rags or flammable liquids carelessly. Follow product labels and keep combustible materials away from heat and sparks.
Final Thoughts
The best garage workbench is not necessarily the biggest or most expensive. It is the one that gives you a clear surface, dependable power, usable light, and a place for tools to go when the job is done.
Start with the hazards and bottlenecks that cause the most trouble: cords underfoot, shadows over the bench, overloaded shelves, or a charging pile with no plan. Fix those first, then add the nice-to-have upgrades as your budget and workspace allow.
Frequently Asked Questions
Do I need an electrician to add outlets near my garage workbench?
For new circuits, fixed receptacles, panel work, hardwired lighting, or any permit-required electrical work, hire a qualified electrician. An electrician should also evaluate outlets that are damaged, warm, unreliable, or failing GFCI tests.
Should I use a power strip for my workbench tools?
A power strip can be useful for compatible plug-in equipment when used according to its instructions and electrical rating. However, it should not substitute for properly located receptacles where you regularly need power. Do not overload it, plug one power strip into another, or rely on extension cords for a permanent charging or tool-power setup.
What is the safest place to store heavy tools?
Store heavy tools in low drawers, lower cabinets, or low shelves where you can lift them without reaching overhead. Confirm that the storage unit and mounting method are rated for the intended load.
What kind of fire extinguisher works for a garage workshop?
Choose an extinguisher appropriate to the hazards present. A multipurpose ABC extinguisher is intended for many common home-fire scenarios, while Class B-rated agents address flammable liquids such as gasoline, oil, and oil-based paints. Read the label and learn how to use the extinguisher before an emergency.