
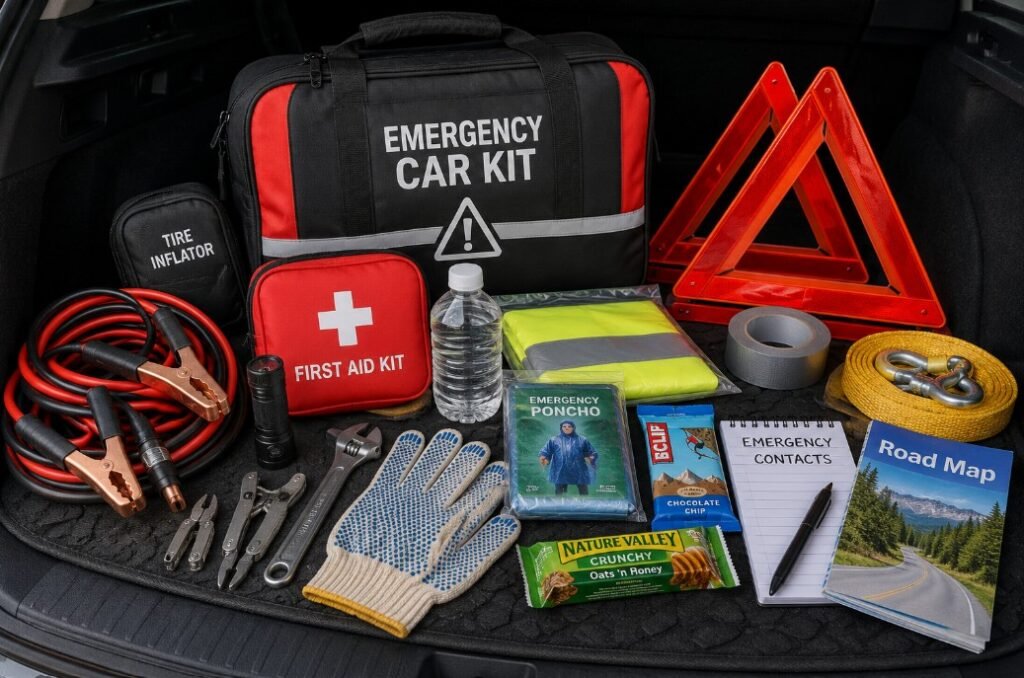
Preparing an emergency car kit is a smart and practical step to take for any driver. Whether it’s a flat tire on a remote road, a sudden storm, or a minor mechanical issue, having a well-stocked kit can make a significant difference in how safely and quickly a situation is managed. Building this kit thoughtfully ensures that it fits the specific needs of the vehicle, the typical driving environment, and the size of the household involved.
An emergency car kit is more than just a collection of random items tossed into the trunk. It’s a carefully curated set of tools and supplies designed to support vehicle repair, personal safety, and comfort during unexpected breakdowns or delays. This guide will walk through assembling a useful, reliable emergency car kit that balances thoroughness with practicality, helping drivers feel prepared without overpacking.
Affiliate disclosure: Some links in this article are affiliate links. If you make a purchase through an affiliate link, I may earn a commission at no additional cost to you. As an Amazon Associate I earn from qualifying purchases.
Quick Facts
- Difficulty: Easy to Moderate
- Time: 1 to 2 hours to assemble
- Cost: Moderate, depending on existing supplies
- Best For: Everyday drivers, commuters, families, and road trip enthusiasts
Project Overview
Building an emergency car kit involves selecting and organizing essential tools, equipment, and supplies that address common roadside problems. The finished kit should provide basic repair capabilities, first aid, and survival essentials tailored to the driver’s typical routes and conditions. This makes it easier to respond calmly and efficiently when facing car trouble or adverse weather.
A well-prepared emergency car kit reduces the risk of being stranded without help and can improve safety until professional assistance arrives. It’s useful for daily commuting and long-distance travel alike, offering peace of mind and practical support during common disruptions like flat tires, dead batteries, or unexpected weather changes.
Tools Needed
- Screwdriver set: Useful for minor repairs and adjustments on the vehicle.
- Pliers: Handy for gripping, bending, or cutting wires or small parts.
- Adjustable wrench: Essential for loosening or tightening bolts and nuts.
- Tire pressure gauge: Helps maintain correct tire pressure and identify slow leaks.
- Flashlight or headlamp: Provides light for nighttime emergencies or low-visibility conditions.
- Jumper cables: Required to jump-start a dead battery safely.
- Tow strap: Useful for pulling the vehicle if stuck or assisting others.
Materials Needed
- First aid kit: Contains bandages, antiseptic wipes, and other medical supplies for minor injuries.
- Reflective warning triangles or flares: Increase visibility to other drivers during breakdowns.
- Road map or printed directions: Serves as a backup when GPS or mobile devices fail.
- Water bottles: Provide hydration during extended delays or heat exposure.
- Non-perishable snacks: Offer energy during long waits or emergencies.
- Blanket or emergency thermal blanket: Helps retain body heat in cold weather.
- Multi-tool or pocket knife: Versatile for small tasks and repairs.
- Gloves: Protect hands during repairs or handling debris.
- Duct tape: Temporary fixes for minor leaks or loose parts.
- Disposable rain poncho: Keeps occupants dry during sudden changes in weather.
Before You Begin
Start by assessing typical driving conditions, climate, and the number of people who will rely on the emergency car kit. Consider whether the area is urban or rural, the likelihood of severe weather, and the frequency of long trips. This helps tailor the kit’s contents and size appropriately.
Choose a clean, flat workspace to organize and assemble the kit. Safety is critical, so handle tools carefully, especially sharp or heavy items. It’s also wise to check the vehicle’s owner manual for any specific recommendations or limitations related to roadside repairs and emergency preparedness.
How to Complete the Project
Step 1: Select a durable storage container
Choose a sturdy, waterproof container or bag that fits comfortably in your vehicle’s trunk or storage compartment. It should be easy to carry and organize, ideally with compartments or pockets.
Step 2: Gather essential tools
Collect basic tools such as screwdrivers, pliers, an adjustable wrench, and a tire pressure gauge. Only include tools that can realistically assist with common repairs to avoid unnecessary bulk.
Step 3: Assemble safety and visibility items
Add reflective warning triangles or flares. These are critical for alerting other drivers if the vehicle is stopped on or near the road, especially at night or in low visibility.
Step 4: Include first aid supplies
Pack a compact first aid kit with bandages, antiseptic, pain relievers, and any personal medications. Ensure the kit is complete and within its expiration dates.
Step 5: Stock hydration and nutrition essentials
Include bottled water and some non-perishable snacks like energy bars or nuts. These support comfort and health during unexpected delays.
Step 6: Add weather-appropriate gear
Include a blanket or emergency thermal blanket and a disposable rain poncho. These items prepare occupants for temperature changes or wet conditions.
Step 7: Include jumper cables and a tow strap
Jumper cables are essential for battery emergencies, and a tow strap can help if the vehicle needs to be pulled out of a ditch or snow. Verify that the cables are rated for your vehicle’s battery size.
Step 8: Add small repair and multipurpose items
Pack duct tape, a multi-tool, gloves, and a pocket knife. These support minor fixes and protect hands during repairs.
Step 9: Prepare navigation backups
Include a paper road map or printed directions of frequently traveled routes. This ensures the ability to navigate if electronic devices fail.
Step 10: Organize and label contents
Arrange items logically inside the container for quick access. Label compartments or bags for items such as first aid, tools, and food to streamline use under stress.
Common Mistakes to Avoid
- Overpacking with unnecessary or bulky items that add weight and clutter.
- Forgetting to periodically check and replace expired first aid supplies or stale food.
- Including tools or equipment without knowing how to use them safely.
- Storing the kit in an inaccessible spot in the vehicle.
- Neglecting to test batteries in flashlights and replace them regularly.
Final Thoughts
Creating an emergency car kit is a practical and achievable project that enhances safety and preparedness for all drivers. By focusing on realistic needs and avoiding overcomplication, the kit becomes a reliable resource during minor roadside incidents or unexpected delays. Regularly reviewing and updating the kit ensures it remains ready whenever it’s needed.
This guide encourages a balanced approach to emergency preparation, helping drivers feel confident and capable without overspending or overpacking. Thoughtful assembly and maintenance of the kit support safer and less stressful travel, making it a worthwhile investment in everyday peace of mind.
Frequently Asked Questions
What are the most essential items in an emergency car kit?
Basic tools, a first-aid kit, reflective warning devices, jumper cables, water, and a flashlight are core essentials for most drivers.
How often should the emergency car kit be checked or updated?
It’s a good practice to review the kit every six months to replace expired supplies, check battery-powered items, and refresh food or water.
Can I customize the kit for different seasons or regions?
Yes, adapting the kit for extreme temperatures, local weather, or terrain is recommended to meet specific needs effectively.
Is it necessary to have jumper cables if my car has roadside assistance?
While roadside assistance is helpful, jumper cables provide immediate help during battery failures and can save time and expense in many situations.