
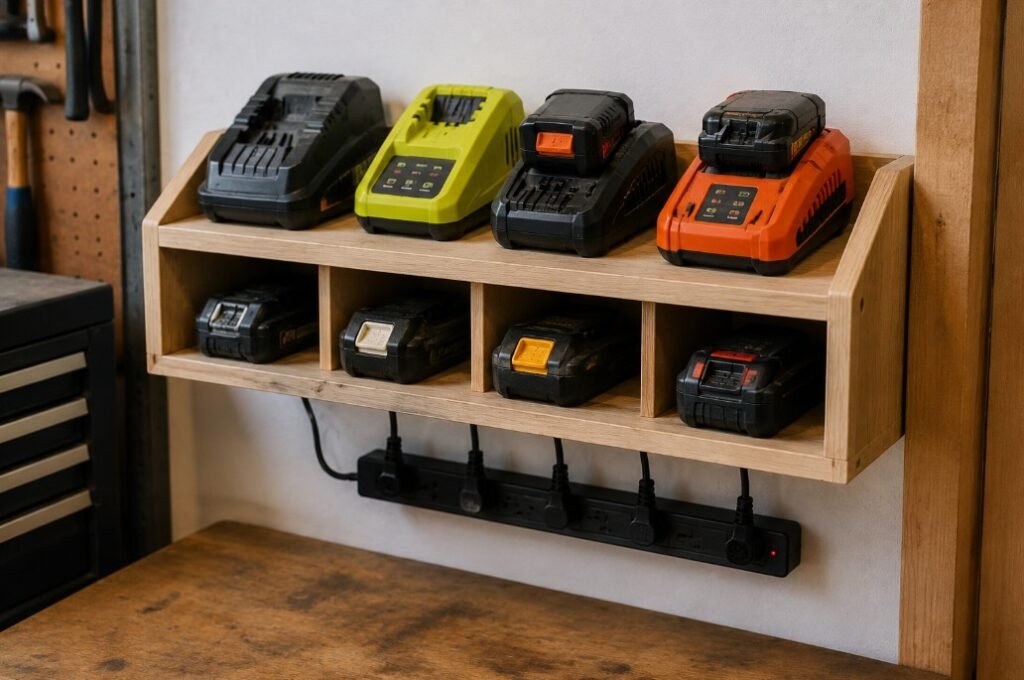
Creating a DIY charging station for power tools is a smart way to keep your workspace organized and your tools ready for action. By having a dedicated spot to charge and store batteries, you save time searching for chargers or misplaced batteries and reduce cord clutter. This project is perfect for anyone who regularly uses cordless power tools and wants a simple, efficient system to keep everything powered up and easy to find.
This guide walks through building a functional, customized charging station that fits your collection of power tool batteries and chargers. It’s designed to be practical and straightforward, making it accessible for beginners while offering enough flexibility to adapt to different tool brands and workspace sizes. With clear steps and useful tips, readers will gain confidence in building an organized charging hub that improves their workflow.
Quick Facts
- Difficulty: Moderate – Basic woodworking and electrical knowledge helpful
- Time: 2 to 4 hours, depending on customization and drying times
- Cost: $30 to $60, depending on materials and size
- Best For: DIY enthusiasts with multiple cordless power tools needing organized charging
Project Overview
The goal of this project is to create a compact, sturdy charging station tailored to your specific power tool batteries and chargers. The finished station typically features multiple compartments or slots to hold batteries upright and to secure chargers in place. This setup prevents cables from tangling and batteries from being misplaced, streamlining the charging process. It also helps protect your batteries and chargers from damage by keeping them off the floor and away from crowded workbenches.
Having a dedicated charging station is especially useful in busy workshops or garages where multiple tools are in use. It saves time by keeping everything in one accessible location and helps extend battery life by encouraging proper charging and storage habits. Plus, customizing the station to your needs means it fits perfectly in your workspace, whether mounted on a wall or placed on a countertop.
Tools Needed
- Measuring tape: To measure battery and charger dimensions and workspace.
- Saw (handsaw or circular saw): For cutting wood or plywood to size.
- Drill with bits: For making holes and driving screws.
- Screwdriver: To fasten screws securely.
- Sandpaper or sanding block: To smooth rough edges for a clean finish.
- Clamps: To hold pieces steady while assembling.
- Pencil: For marking measurements and cutting lines.
Materials Needed
- Plywood or MDF board: Serves as the base and sides of the charging station.
- Wood screws: To assemble the structure firmly.
- Wood glue: For additional bonding strength between pieces.
- Cable ties or clips: To organize and secure charging cables neatly.
- Rubber feet or pads: Prevent the station from sliding on surfaces.
- Paint or wood finish (optional): For protecting the wood and customizing appearance.
Before You Begin
Begin by gathering your power tool batteries and chargers to carefully measure their dimensions. Note the number of batteries and chargers you plan to store, as well as any extra space you want for future additions or accessories. Sketch a rough layout of the charging station that fits your workspace, whether it will be wall-mounted or sit on a bench. Ensure you have enough clearance for plugging in chargers and easy access to batteries.
Set up a clean, well-lit workspace with enough room to cut and assemble your materials safely. Wear safety glasses and a dust mask when cutting wood to protect yourself from debris. Organize your tools and materials before starting to streamline the building process. Taking the time to plan thoroughly will help prevent surprises and ensure the finished charging station meets your needs.
How to Complete the Project
Step 1: Measure and Mark Your Wood Pieces
Measure the length, width, and height needed for your charging station based on your batteries and chargers. Mark your plywood or MDF board with these dimensions, including slots or compartments for each battery and charger. Double-check your measurements to avoid errors before cutting.
Step 2: Cut the Wood Pieces
Using a saw, carefully cut the wood according to your marked lines. Cut the base, sides, dividers, and any shelves or slots you planned. Smooth the edges with sandpaper to avoid splinters and ensure a neat finish.
Step 3: Assemble the Base and Sides
Apply wood glue to the edges of the base piece and attach the side panels. Use clamps to hold the pieces in place, then fasten them with wood screws. Make sure the structure is square and level before the glue dries.
Step 4: Add Dividers and Compartments
Install vertical dividers or compartments inside the charging station to hold batteries upright and chargers secure. Use wood glue and screws for durability. Measure carefully so each compartment fits the battery or charger snugly without being too tight.
Step 5: Prepare Cable Management
Attach cable clips or use cable ties inside the station to organize charger cords. Position these so cables are accessible but don’t tangle or hang loosely. This step keeps your workspace tidy and prevents cords from getting damaged.
Step 6: Install Rubber Feet or Pads
Attach rubber feet to the bottom corners of the charging station to prevent slipping and protect your work surface. This small addition adds stability and keeps the station from scratching countertops or benches.
Step 7: Test Fit and Adjust
Place your batteries and chargers in their compartments to test the fit. Make any necessary adjustments by sanding or trimming dividers to ensure everything fits comfortably and is easy to remove. This step ensures your charging station functions smoothly.
Step 8: Finish the Surface (Optional)
If desired, apply a wood finish or paint to protect the station from moisture and wear. Choose a finish that suits your workspace and allows easy cleaning. Allow adequate drying time before using the station.
Step 9: Position and Plug In
Set the charging station in your chosen location—on a bench, on a shelf, or mounted on a wall. Plug in your chargers and arrange cables neatly. Your charging station is now ready to keep your power tools powered and organized.
Common Mistakes to Avoid
- Not measuring batteries and chargers accurately, leading to poorly fitting compartments.
- Using wood that is too thin or weak, which can cause the station to wobble or break.
- Neglecting cable management, resulting in tangled cords and clutter.
- Skipping sanding, which can leave rough edges that cause splinters or damage batteries.
- Overlooking ventilation around chargers, which can cause overheating.
- Rushing assembly without clamps or proper fastening, leading to unstable construction.
Final Thoughts
Creating a DIY charging station for power tools is a practical project that brings order and efficiency to any workspace. It helps keep batteries charged and ready to go while preventing clutter and cable chaos. With a bit of planning and basic woodworking skills, anyone can build a customized station that fits their tools and work habits perfectly.
Investing time into organizing your charging setup not only improves your workflow but also protects your power tool batteries and chargers from damage. This straightforward project offers lasting benefits, making your tools easier to find and use. With these clear steps and tips, building a reliable charging station becomes a rewarding and manageable task for any DIY enthusiast.